 Redis 8 发布了——并且是开源的
了解更多

在线学习从未如此普及。 无论您是想了解有关加密货币的更多信息,提高您的编程技能,甚至只是学习一门新语言,数字时代都让每个人都可以访问大量的优质内容。
然而,随着时间的推移,在线学习已被视为另一种数字商品,用户希望所有在线内容都能即时呈现。速度仍然对性能至关重要,页面加载时间的任何滞后或延迟都会影响用户的体验。
因此,这些高期望要求任何称职的在线学习平台都必须由能够以超高效率处理、处理和传输数据的数据库提供支持……这正是此Launchpad App 使用 Redis 的原因。
从头到尾,此应用程序旨在通过将学习者与基于其兴趣的最相关的课程联系起来,从而连接、教育和赋能学习者。
让我们研究一下这是如何实现的。 但在我们深入研究之前,您可能还想查看我们在 Launchpad 上的所有其他精彩应用程序。

您将构建一个强大的在线学习平台,将学生和教师彼此连接起来,以及一个多样化的在线课程库。 速度是性能的关键,您将部署许多不同的 Redis 组件来实现此目标。
下面我们将揭示使此应用程序得以实现所需的组件以及每个项目的功能。

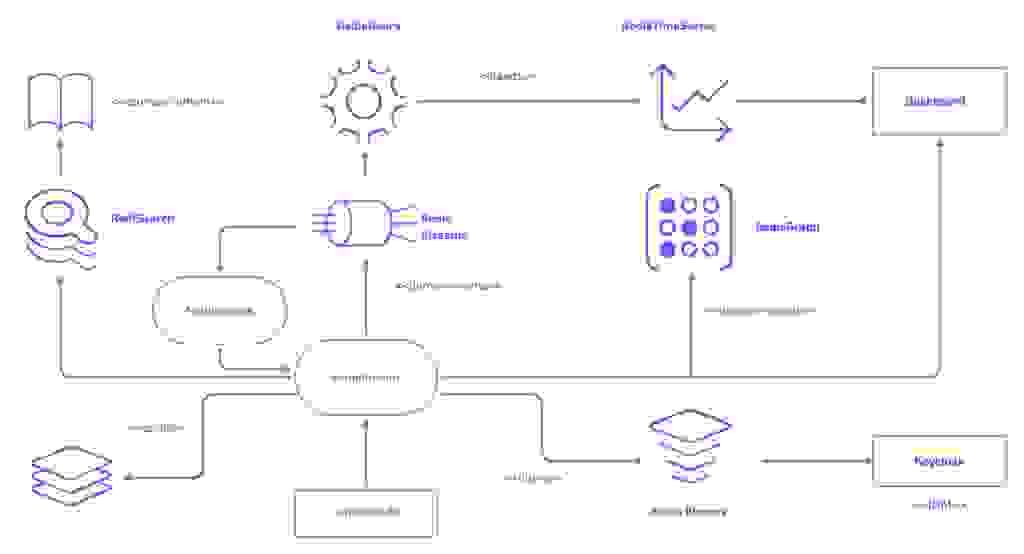
数据模型通过使用 RedisGraph 的节点和关系来表达。 该模型非常简单,因为它涉及学生、课程和主题实体,表达了彼此之间不同类型的关系。

X-Mentor 遵循事件驱动架构方法,其中考虑了以下领域事件
https://github.com/redis-developer/x-mentor
$ docker-compose ps
Name                         Command               State            Ports
---------------------------------------------------------------------
x-mentor_x-gears_1           python3 init.py --url redi ...   Up
x-mentor_x-keycloak_1        /opt/jboss/tools/docker-en ...   Up       0.0.0.0:8880->8080/tcp, 8443/tcp
x-mentor_x-mentor-client_1   /docker-entrypoint.sh ngin ...   Up       0.0.0.0:3000->80/tcp
x-mentor_x-mentor-core_1     /opt/docker/conf/wait-for- ...   Up       0.0.0.0:9000->9000/tcp
x-mentor_x-redis_1           redis-server --loadmodule  ...   Up       0.0.0.0:6379->6379/tcp
[node1] (local) [email protected] ~/x-mentor
$
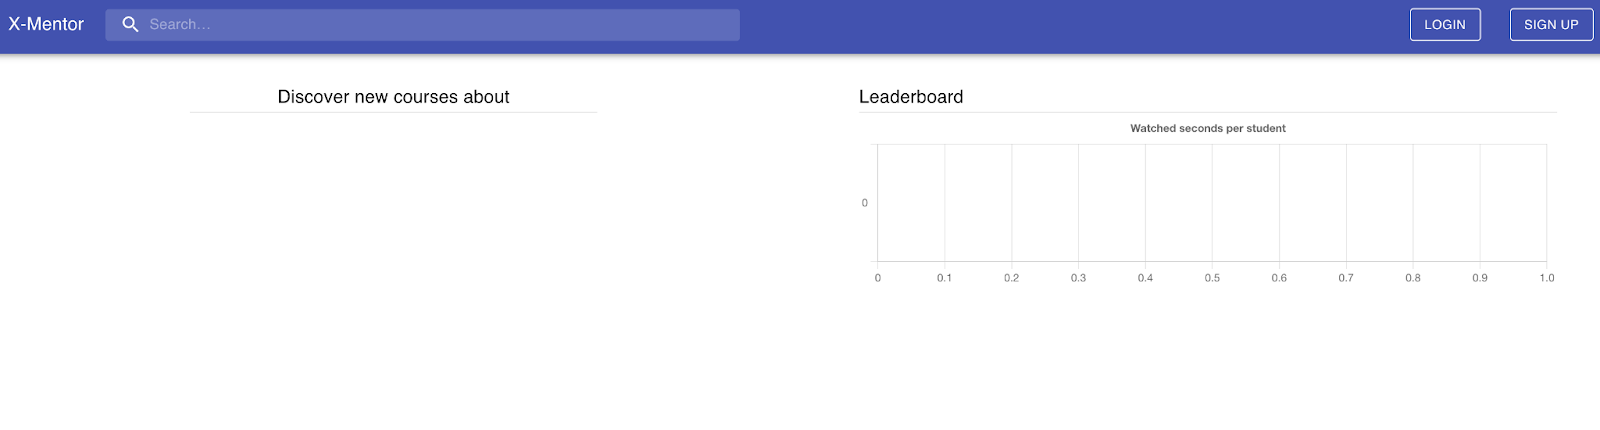
等待 Keycloak 和 x-mentor-core 准备就绪,然后转到 https://:3000。
您可以通过 8880 端口访问 Keycloak,如下所示

使用 admin/admin 登录到 Keycloak。

此步骤通过以下方式启动针对 Keycloak 的身份验证过程
使用以下代码检查并查看用户名是否已存在于 users Bloom 过滤器中
BF.EXISTS users '${student.username}'

注册涉及 4 个步骤

BF.ADD users '${student.username}'
GRAPH.QUERY xmentor "CREATE (:Student {username: '${student.username}', email: '${student.email}'})"
TS.CREATE studentprogress:${username} RETENTION 0 LABELS student ${username}
在此步骤中,我们将向您展示如何创建课程以在在线学习平台上发布。 每门课程都将作为 JSON 存储在 RedisJSON 中。
:
按照以下命令操作
GET course-last-index
INCR course-last-index
JSON.SET course:${course.id} . '${course.asJson}'
BF.ADD courses '${course.id}'
GRAPH.QUERY xmentor "CREATE (:Course {name: '${course.title}', id: '${course.id.get}', preview: '${course.preview}'})"
XADD course-created $timestamp title ${course.title} topic ${course.topic}
在这里,我们将揭示如何让学生注册特定课程。

以下是您需要遵循的步骤
BF.EXISTS users ${student.username}
JSON.GET course:${course.id}
GRAPH.QUERY xmentor "MATCH (s:Student), (c:Course) WHERE s.username = '${studying.student}' AND c.name = '${studying.course}' CREATE (s)-[:studying]->(c)"
作为任何在线资源的一部分,用户通常能够提供评论。 要实现此功能,您需要执行以下步骤
下图说明了 Redis Graph 和 Redis Streams 之间的交互。

要实现此功能,请按照以下命令操作
GRAPH.QUERY xmentor "MATCH (student)-[:studying]->(course) where student.username = '$student' RETURN course"
GRAPH.QUERY xmentor "MATCH (student)-[:rates]->(course) where student.username ='$student' RETURN course"
GRAPH.QUERY xmentor "MATCH (s:Student), (c:Course) WHERE s.username = '${rating.student}' AND c.name = '${rating.course}' CREATE (s)-[:rates {rating:${rating.stars}}]->(c)"
XADD course-rated $timestamp student $student_username course $course
	starts $stars
所有
以下命令从 redisJSON 中检索带有 rediSearch 的查询课程
FT.SEARCH courses-idx ${query}*
按 ID
BF.EXISTS courses ${course.id}
JSON.GET course:${course.id}
GRAPH.QUERY xmentor “MATCH (student)-[:studying]->(course) where student.username = ‘$student’ RETURN course”
FT.SEARCH courses-idx ${course.title}
现在我们将向您展示如何允许学生根据自己的兴趣过滤首选课程。 下面是如何操作的
下图显示了 RedisGraph 和 Redis Streams 之间的交互。

以下是您需要遵循的命令
GRAPH.QUERY xmentor "MATCH (student)-[:interested]->(topic) WHERE
student.username ='$student' RETURN topic"
GRAPH.QUERY xmentor "MATCH (s:Student), (t:Topic) WHERE s.username =
	'${interest.student}' AND t.name = '${interest.topic}' CREATE
(s)-[:interested]->(t)"
GRAPH.QUERY xmentor "MATCH (student)-[interest:interested]->(topic) WHERE student.username='${interest.student}' and topic.name='${interest.topic}' DELETE interest"
XADD student-interest-lost $timestamp student ${student.username} topic $topic
XADD student-interest-lost $timestamp student ${student.username} topic $topic
在这里,我们将向您展示如何创建一个课程推荐系统,将用户与与其兴趣最相关的课程联系起来。 这在很大程度上取决于 RedisGraph 的高级功能。
在图形数据库中搜索节点之间的关系是实现最有效推荐策略的最简单方法。 让我们看看如何做到这一点。
为了让您创建一个特殊的推荐系统,将用户的个人兴趣与最相关的课程相匹配
GRAPH.QUERY xmentor "MATCH (student)-[:studying]->(course) where student.username = '$student' RETURN course"
GRAPH.QUERY xmentor "MATCH (topic:Topic) RETURN topic"
GRAPH.QUERY xmentor "MATCH (topic:Topic)-[:has]->(course:Course)
GRAPH.QUERY xmentor "MATCH (student)-[:studying]->(course) WHERE course.name = '$course' RETURN student"
GRAPH.QUERY xmentor "MATCH (topic)-[:has]->(course) WHERE
	topic.name = '${topic.name}' RETURN course"
GRAPH.QUERY xmentor "MATCH (student)-[:interested]->(topic) WHERE student.username ='$student' RETURN topic"
GRAPH.QUERY xmentor "MATCH (student)-[:studying]->(course),
	(topic)-[:has]->(course) where student.username = '${student.username}'
	and topic.name = '${topic.name}' RETURN course"
GRAPH.QUERY xmentor "MATCH (student)-[:studying]->(course), (topic)-[:has]->(course) WHERE student.username = '${student.username}' RETURN topic"
此功能将允许您跟踪用户在平台上观看课程所花费的时间。 然后,该信息将用于实施排行榜。

一旦 x-mentor-core 收到请求,它将发布学生进度注册域事件。这将最终通过以下命令成为 student-progress-registered 流(这是一个 Redis 流)中的一个元素
XADD student-progress-registered $timestamp student $student_username duration $duration
所有发送到 RedisGears 的数据都将被推送到流中,然后使用以下命令将此数据汇集到 Redis TimeSeries 中
TS.ADD studentprogress:$student_username $timestamp $duration RETENTION 0 LABELS student $student_username
排行榜功能使您可以拥有一个排行榜,显示使用 X-Mentor 的顶级学生的排名。学生根据他们在平台上观看内容的时间长短进行排名——观看时间越长,排名越高。
要实现这一点,您需要分离两个功能

当用户请求排行榜数据时,首先在 Redis 中查找时间序列键
LRANGE student-progress-list 0 -1 // to retrieve all the list elements
对于每个键,您需要使用 Redis TimeSeries 获取三个月时间窗口内的样本范围,并执行求和聚合。您可以使用以下代码来实现这一点
TS.RANGE $student_key $thee_months_back_timestamp $timestamp AGGREGATION sum 1000
以下是为此需要实施的额外先决条件。
执行这些命令将为您提供每个学生的累计屏幕时间。一旦您收到这些排名,您就可以根据屏幕时间最多的人创建一个排名系统。
在这个数字时代,任何应用程序的一个简单先决条件就是以最快的速度运行。对于电子学习平台来说尤其如此,因为用户需要在很长一段时间内参与其课程内容。
仅仅是延迟就会在用户和应用程序之间产生摩擦,从而抑制其连接教师和学生以及通过其课程提供价值的能力。将 Redis 作为应用程序的主要数据库消除了这种威胁,并帮助创建了一个完全优化的应用程序,可以轻松满足用户的需求。
要更直观地了解此应用程序是如何创建的,您可以观看此YouTube 视频。我们还在 Redis Launchpad 上为您提供各种应用程序,这些应用程序正在对世界各地的日常生活产生影响。
请务必查看它们!


Sergio Cano
塞尔吉奥是一位全栈工程师,用他自己的话说,“喜欢解决问题和学习新东西。”
作为一个热情的学习者,不难看出他从哪里获得了构建此应用程序的灵感。
请务必点击此处查看他的个人资料,看看他还参与了哪些其他项目。


